<?xml version="1.0" encoding="utf-8"?><feed xmlns="http://www.w3.org/2005/Atom" ><generator uri="https://jekyllrb.com/" version="3.10.0">Jekyll</generator><link href="https://alstabuilds.com/feed.xml" rel="self" type="application/atom+xml" /><link href="https://alstabuilds.com/" rel="alternate" type="text/html" /><updated>2026-09-26T02:56:30+00:00</updated><id>https://alstabuilds.com/feed.xml</id><title type="html">alstaBuilds</title><subtitle>Build videos and notes from the alstaBuilds YouTube channel.</subtitle><entry><title type="html">Japanese Saw Horse Weekend Build</title><link href="https://alstabuilds.com/2026/09/12/japanese-saw-horse-build/" rel="alternate" type="text/html" title="Japanese Saw Horse Weekend Build" /><published>2026-09-12T00:00:00+00:00</published><updated>2026-09-12T00:00:00+00:00</updated><id>https://alstabuilds.com/2026/09/12/japanese-saw-horse-build</id><content type="html" xml:base="https://alstabuilds.com/2026/09/12/japanese-saw-horse-build/"><![CDATA[<p>Building a pair of Japanese-style saw horses over a weekend.</p>

<h2 id="plans">Plans</h2>

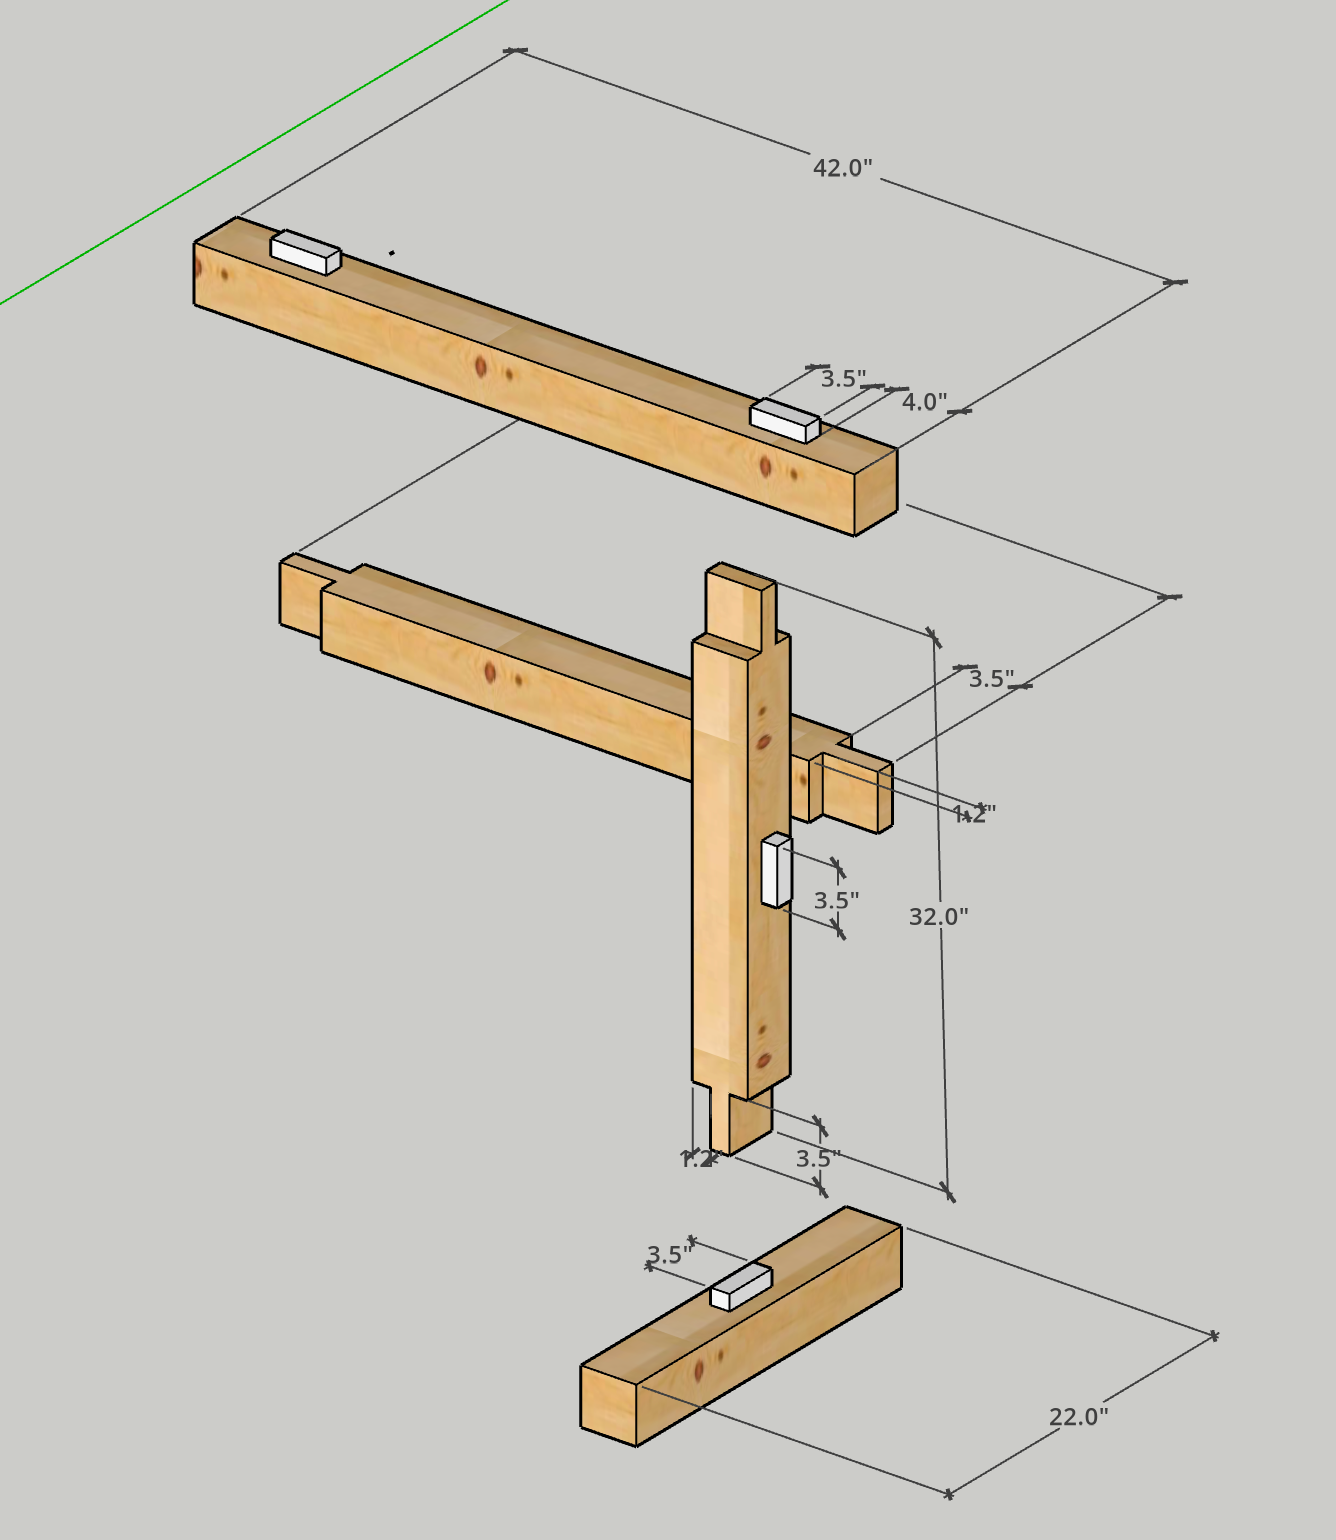
<p>These free plans build one saw horse from two 8 ft 4x4s. Build two for a pair. The parts join with mortise and tenon joints, with no screws.</p>

<p><img src="/assets/plans/japanese-saw-horse-build/assembly.png" alt="Saw horse parts lined up for assembly: top, support rail, leg, and foot" /></p>

<p>The finished saw horse is 42” long, 22” deep, and 32” tall.</p>

<h3 id="cut-list">Cut list</h3>

<p>All parts are 4x4 (3 1/2” × 3 1/2”).</p>

<table>
  <thead>
    <tr>
      <th>Part</th>
      <th>Qty</th>
      <th>Length</th>
      <th>Joinery</th>
    </tr>
  </thead>
  <tbody>
    <tr>
      <td>Top</td>
      <td>1</td>
      <td>42”</td>
      <td>2 mortises</td>
    </tr>
    <tr>
      <td>Support rail</td>
      <td>1</td>
      <td>38”</td>
      <td>1 tenon at each end</td>
    </tr>
    <tr>
      <td>Leg</td>
      <td>2</td>
      <td>32”</td>
      <td>1 tenon at each end, 1 mortise</td>
    </tr>
    <tr>
      <td>Foot</td>
      <td>2</td>
      <td>22”</td>
      <td>1 mortise</td>
    </tr>
  </tbody>
</table>

<h3 id="cutting-the-lumber">Cutting the lumber</h3>

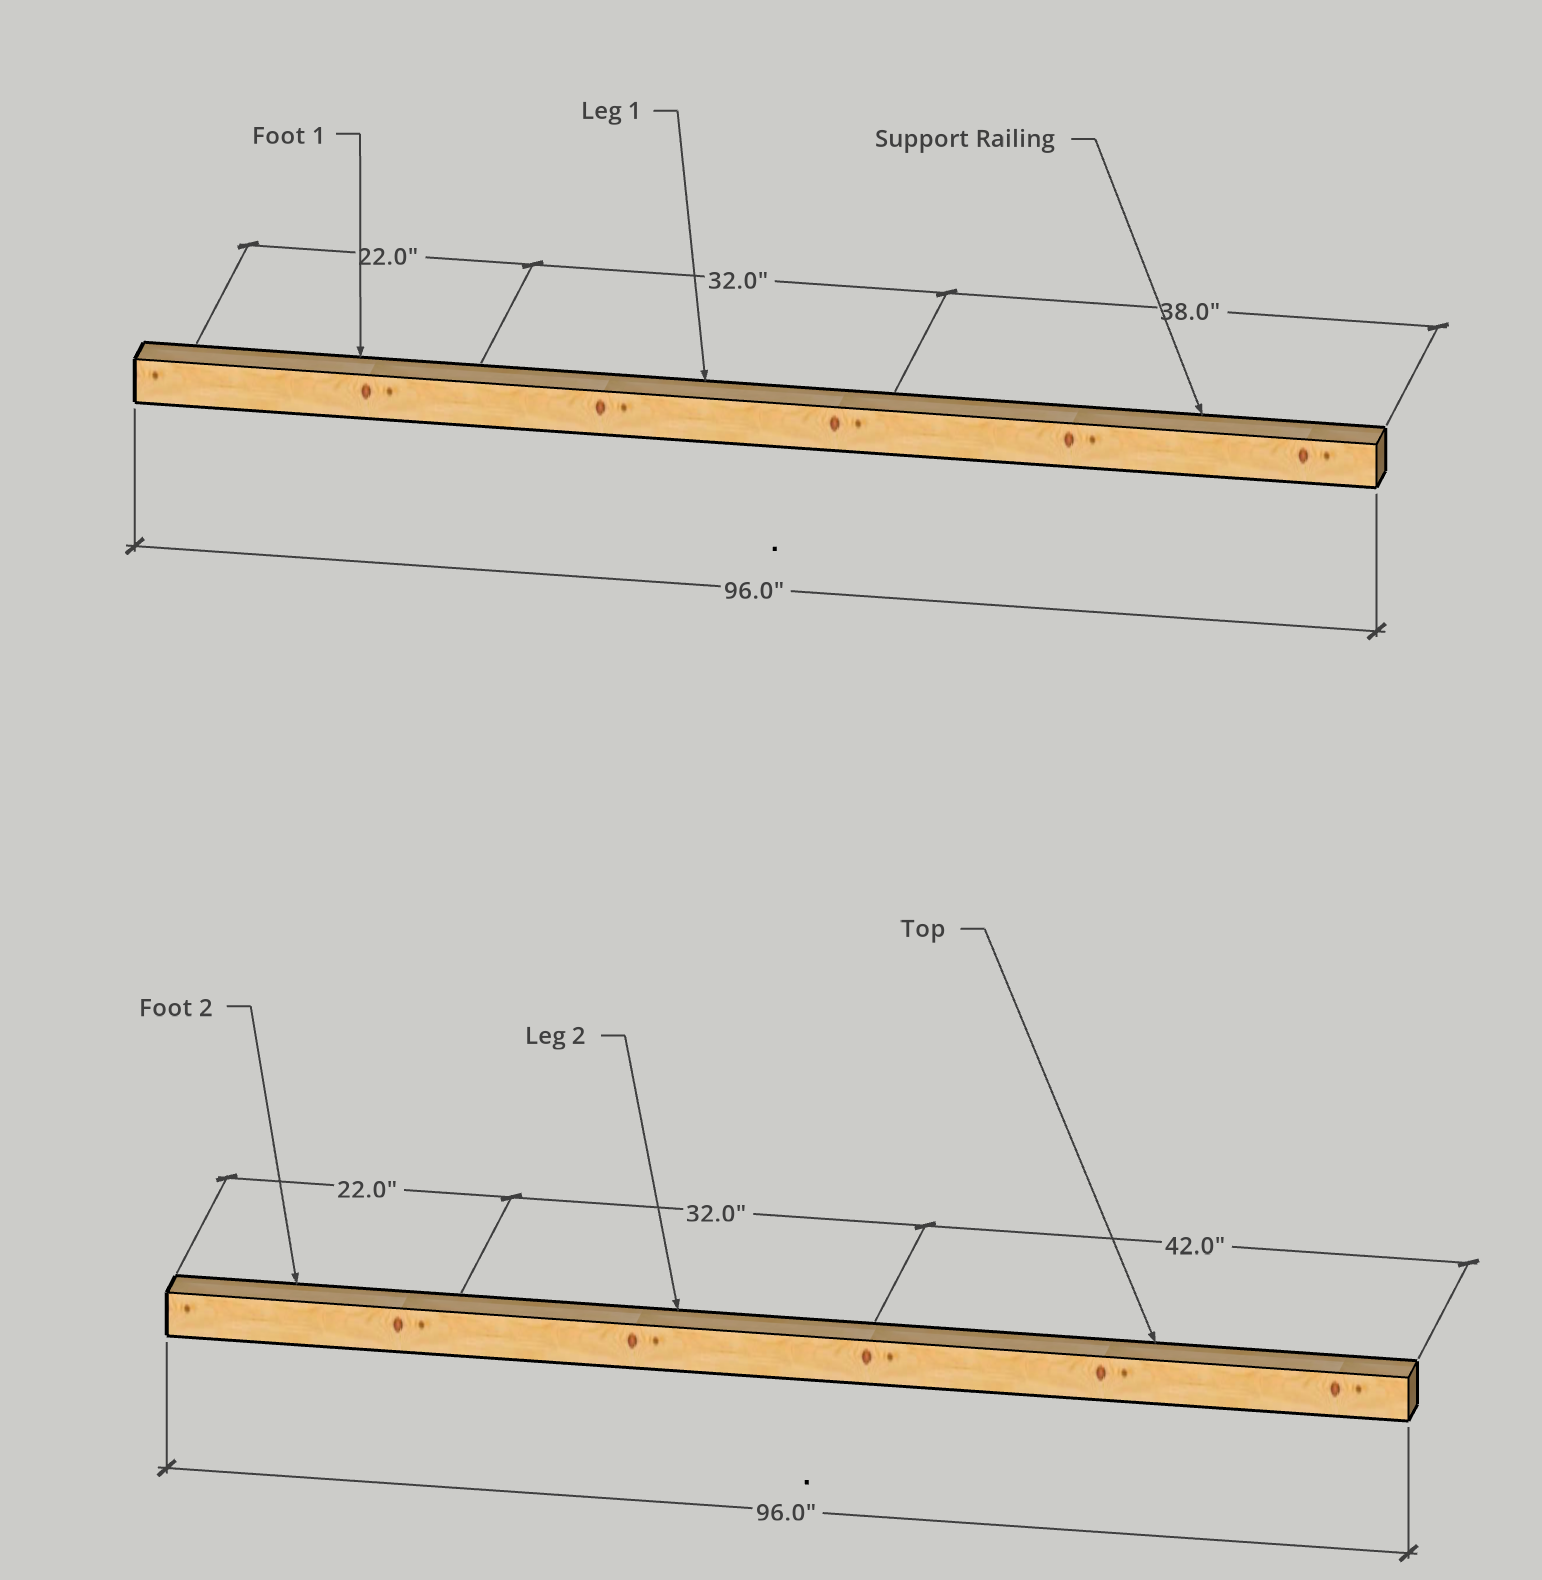
<p>Cut the six parts from two 8 ft 4x4s:</p>

<ul>
  <li><strong>Board 1:</strong> foot (22”), leg (32”), and support rail (38”). This leaves about 4” spare.</li>
  <li><strong>Board 2:</strong> foot (22”), leg (32”), and top (42”). These parts use the full 96”.</li>
</ul>

<p>Board 2 has no room for saw kerf. Measure your board first; many 8 ft boards run a little long. If yours is exactly 96”, cut the top last and accept a slightly shorter top.</p>

<p><img src="/assets/plans/japanese-saw-horse-build/cutting-diagram.png" alt="Cutting diagram: two 96-inch 4x4s, one cut into foot, leg, and support rail, the other into foot, leg, and top" /></p>

<h3 id="joinery">Joinery</h3>

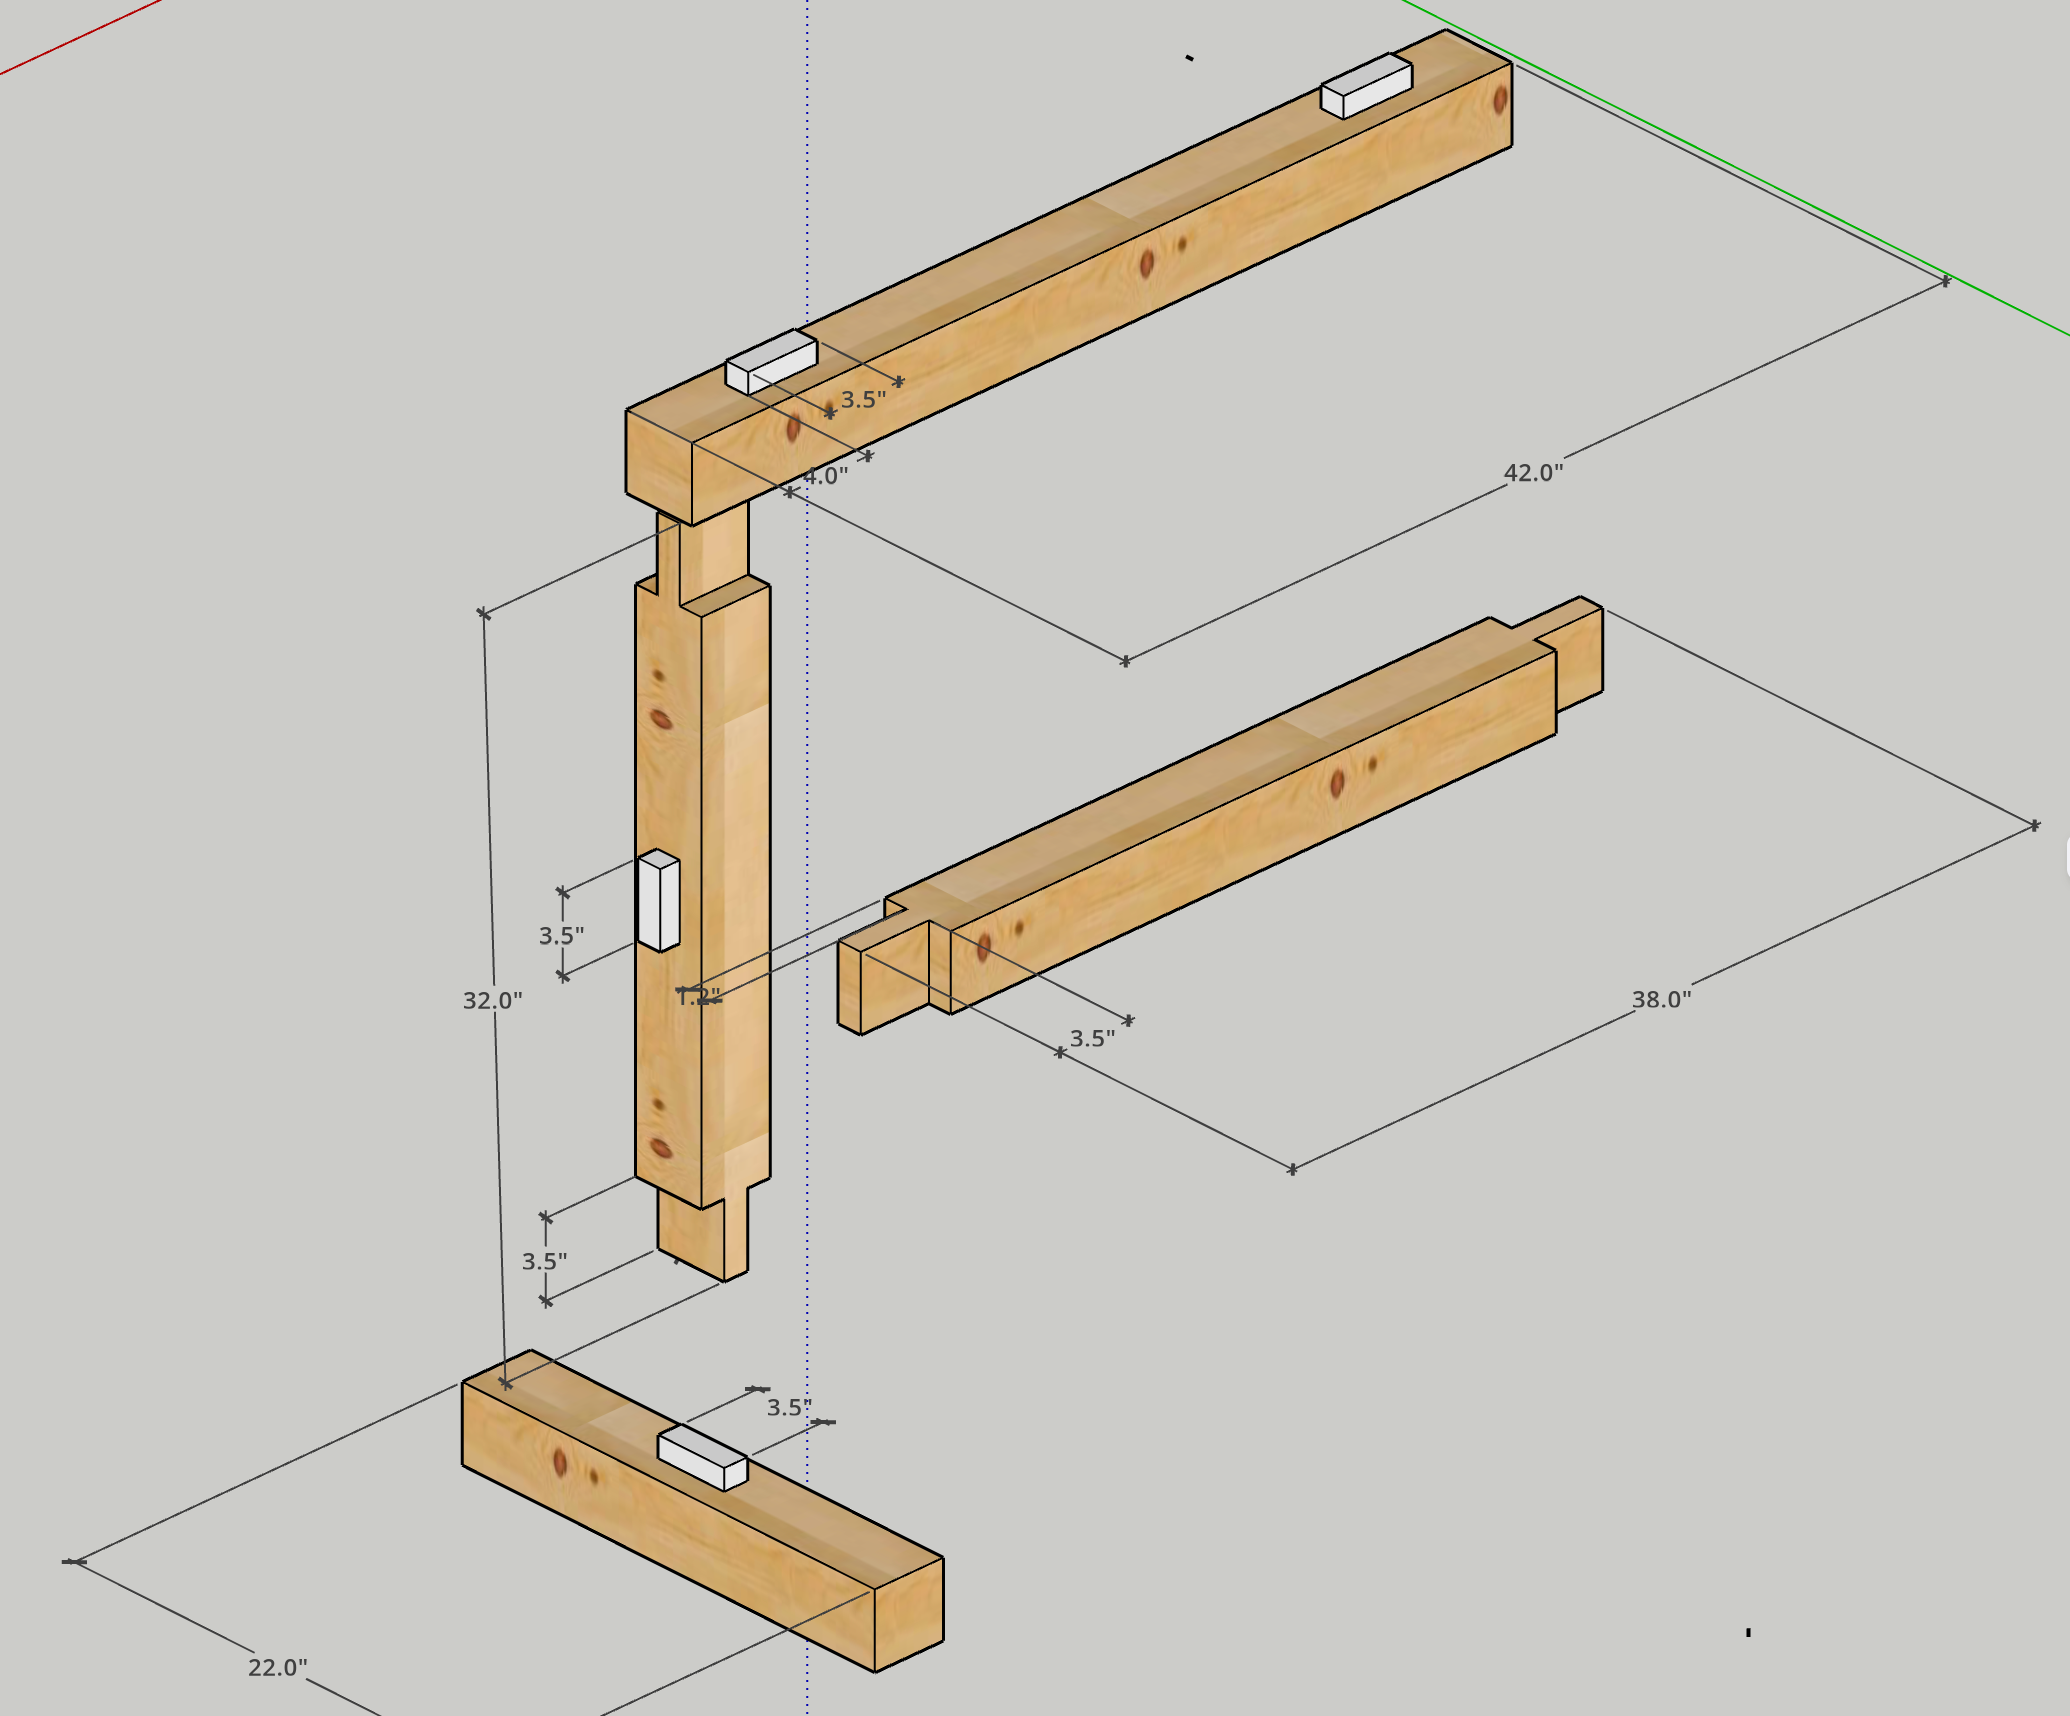
<p>Every tenon and mortise is 3 1/2” wide and 1 3/16” thick. Each tenon is 3 1/2” long, the full thickness of a 4x4, so every mortise goes all the way through.</p>

<ul>
  <li><strong>Leg:</strong> cut a centered tenon on each end. The two tenons turn 90° to each other: the top tenon lines up with the top, and the bottom tenon lines up with the foot. The 25” between the shoulders sets the height. Cut one mortise through the side, centered on the length, for the support rail.</li>
  <li><strong>Support rail:</strong> cut a centered tenon on each end. The shoulders are 31” apart.</li>
  <li><strong>Top:</strong> cut two mortises down through the top, each starting 4” from an end and centered across the width.</li>
  <li><strong>Foot:</strong> cut one mortise, centered on the length and across the width.</li>
</ul>

<p><img src="/assets/plans/japanese-saw-horse-build/parts.png" alt="Exploded view with joinery sizes: 3.5-inch tenons and mortises, 1.2-inch tenon thickness, top mortises 4 inches from each end" /></p>

<h3 id="assembly">Assembly</h3>

<ol>
  <li>Push the support rail’s tenons through the mortises in the two legs.</li>
  <li>Set each leg’s bottom tenon into a foot.</li>
  <li>Lower the top onto the legs’ top tenons.</li>
</ol>]]></content><author><name></name></author><category term="woodwork" /><category term="one-day-build" /><summary type="html"><![CDATA[Building a pair of Japanese-style saw horses over a weekend.]]></summary></entry><entry><title type="html">Sauna Build #1: Site Prep and Tree Removal</title><link href="https://alstabuilds.com/2026/06/20/sauna-build-1-site-prep/" rel="alternate" type="text/html" title="Sauna Build #1: Site Prep and Tree Removal" /><published>2026-06-20T00:00:00+00:00</published><updated>2026-06-20T00:00:00+00:00</updated><id>https://alstabuilds.com/2026/06/20/sauna-build-1-site-prep</id><content type="html" xml:base="https://alstabuilds.com/2026/06/20/sauna-build-1-site-prep/"><![CDATA[<p>Part 1 of the sauna build: clearing trees and preparing the site for the deck.</p>]]></content><author><name></name></author><category term="sauna" /><summary type="html"><![CDATA[Part 1 of the sauna build: clearing trees and preparing the site for the deck.]]></summary></entry><entry><title type="html">Garage Heat Pump Install: Senville Leto 18000 BTU</title><link href="https://alstabuilds.com/2026/05/14/garage-heat-pump-install/" rel="alternate" type="text/html" title="Garage Heat Pump Install: Senville Leto 18000 BTU" /><published>2026-05-14T00:00:00+00:00</published><updated>2026-05-14T00:00:00+00:00</updated><id>https://alstabuilds.com/2026/05/14/garage-heat-pump-install</id><content type="html" xml:base="https://alstabuilds.com/2026/05/14/garage-heat-pump-install/"><![CDATA[<p>A start-to-finish install of a Senville Leto 18000 BTU heat pump in the garage, including the electrical work.</p>]]></content><author><name></name></author><category term="home-improvement" /><summary type="html"><![CDATA[A start-to-finish install of a Senville Leto 18000 BTU heat pump in the garage, including the electrical work.]]></summary></entry></feed>